


2013年7月27日 星期六
2013年7月26日 星期五
2013年7月25日 星期四
How to build a toilet-flushing Lego robot
By Evan Blass posted Sep 28th, 2007 at 8:12 AM
RoboFlush:

The Video:
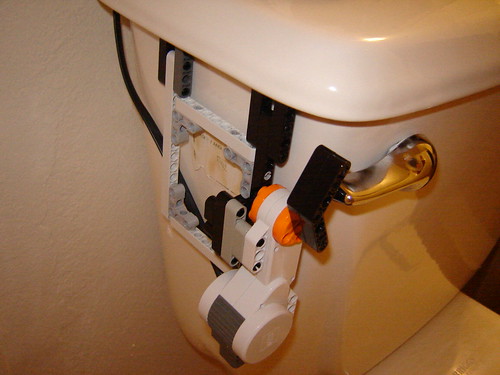
The Flusher:
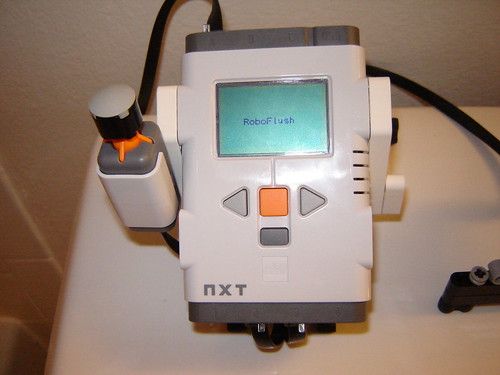
The NXT and Manual Flush:
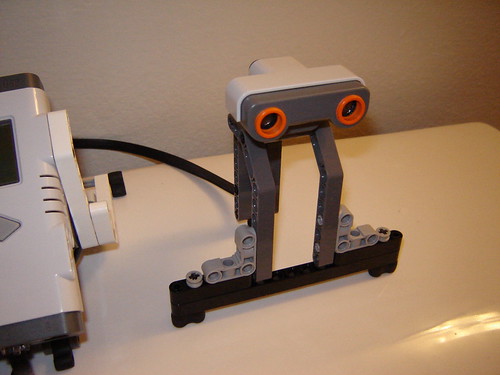
The Ultrasonic Sensor:
The Lucky Toilet: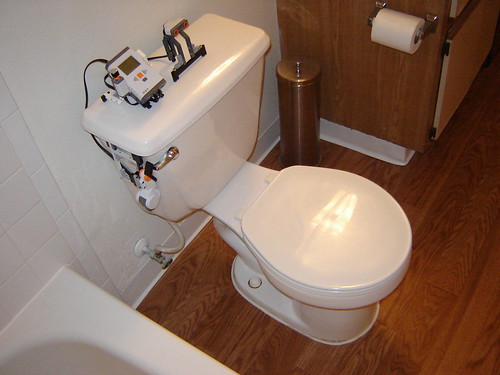
資料來源
Tired of flushing your own toilet? Build a RoboFlush! RoboFlush is a simple Lego NXT Mindstorms Robot designed to flush a toilet automatically. It also comes with a manual flush option! Check out these instructions to build your own. Mike D'Amour came up with the idea, and Will Gorman built and documented RoboFlush.
How much do you know about Lego Robotics? Take the Lego Mindstorm Quiz atSomeTests.com
How much do you know about Lego Robotics? Take the Lego Mindstorm Quiz atSomeTests.com
RoboFlush:
The Video:
The Flusher:
The flusher is mounted under the toilet bowl cover for the extra weight. Flushing requires no gearing, the NXT motor is strong enough to flush every time.
The NXT and Manual Flush:
The program for this robot is a little complicated in the NXT graphical language. It would be much simpler to understand in a traditional language like Java.
The Ultrasonic Sensor:
The ultrasonic sensor waits till it detects someone in range, then waits till that person is out of range. A polite thank you, and then flush!
The Lucky Toilet:
資料來源
2013年7月23日 星期二
二信高中創研社辦機器人夏令營
二信高中創研社今年首度舉辦「飛行器機器人夏令營」,第一場對象為該校國中部一年級新生,多軸飛行器、機器人勁舞、迷宮秀等,國中生超開心,興緻高昂,第二場開放基隆市國小學生報名,反應相當熱烈,短短幾天已全數額滿。
二信高中表示:該校創研社成立近十年來,在全國創意競賽中獲獎無數,參賽學生累積出不少經驗,加上該校電機科及國中部的指導教師群,他們規畫出一套暑期夏令營課程,於七月二十、二十一舉辦國中組,預計在二十七、二十八日舉辦國小組,希望藉由寓教於樂的活動,啟發孩子無限的創意與技能。
二信高中指出,創研社師資群包括國中部數學教師郭世昌,自然教師盧丁諱、楊宙諭、電機科劉兆祥主任、機械科賴宏彰老師及廣設科謝啟駿主任,他們平日投入在學校教育工作,課餘時間玩玩科技產品,一群老師教學相長,玩出樂趣,將「玩具」、「科技」與學校課程結合,組成創研社,指導學生創意思考,從「玩具」與「科技」中引發學生的學習樂趣,參加各項創思競賽。
創研社指導老師郭世昌表示,目前我們在玩的「多軸飛行器」,有三軸、四軸、六軸、八軸,常用作空拍風景、空中氣體收集檢測、活動攝影,救災、高樓火警監控、國土森林監測…等,要完成一項攝影、監測工作,必須運用多項科技產品,從中可預先學習到很多理論與實務操作的技能,這次的夏令營除了讓學生能體驗科技的進步外,也藉由孩子喜歡的樂高玩具及機器人實作,啟發學生的無限創意及學習技能。
國中組已在二十、二十一日滿落幕,參加的二信國中部國一新生四十餘位,當天課程包括組裝機器人、程式及超音波感應教學,另外還有飛行秀、迷宮競賽、飛行模擬器練習及飛行競賽,課程活潑生動,參與的學生興緻高昂,玩得很開心,結束後每人都獲得一份與課程有關的飛行器或機器人,收穫滿行囊。
An Easy Link between Arduino and Android
Annikken Andee is an Arduino Shield that lets you connect your Arduino to your Android phone via bluetooth easily. With the free Annikken Andee Library and Android App, you can create your very own monitor and control user interface on your Android Devices from the Arduino IDE. This simply means you are NOT required to develop any Android Apps at all.
Works with Arduino

Annikken Andee is designed to fit and work with Arduino Uno, Arduino Mega and Arduino Leonardo. For variants like Arduino Nano, you will have to connect the ICSP header correctly and also pin 8 together. Support for other Arduinos (e.g Due) are still currently being tested.
Annikken Andee and Arduino communicates using Arduino's ICSP header (SPI) and pin 8, leaving the rest of the pins for connection with other sensors or modules. Refer to manual for details.
Code in Arduino - Create Android Interface

Annikken Andee differentiates itself from other bluetooth shields by allowing Arduino developers to have an touch and display Android interface with NO NEED for any Android development effort.


Instead of providing Android project samples which you need to modify and adapt to your application, we give you an Android App and a Annikken Andee library for Arduino. What this means is that you will be using the easy to use Arduino environment to create data displays or buttons on the Android App - as shown above.
Wireless Bluetooth Data Transmission

Annikken Andee and the Android app communicates using the FCC CE certified WT11i bluetooth module from Bluegiga. This module is capable of reaching distances of up to 350 meters line-of-sight module-to-module. (For actual distance, it depends on the bluetooth chip of your Android device and also how/where Annikken Andee is being positioned.)
Types of Android Displays
There are three types of displays you can create on the Android App with colors you can customize using argb values. Displays can be configured to occupy quarters, thirds, half or full width of your Android screen.
- Data DisplaysThese are displays used for providing user with feedback. Up to 3 text fields each display which you can choose to display any text or numbers you want.
- Button DisplaysThese displays catch user inputs from Android user. Your Arduino code can call a function to find out if the button was pressed or not, and perform handling functions from there on.
- Keyboard DisplaysSimilar to button displays. Shows the Android keyboard for users to enter text, numbers or password. Arduino can retrieve this value using a function call.


Onboard SD Card


Annikken Andee provides an sd card slot for use a non-volatile data storage. You can use it to write log data from your Arduino application. For ease of use, we provide read and write functions from Annikken Andee library for Arduino. In addition, you can use an sdcard to upgrade Annikken Andee's firmware with the latest images to ensure you get the most recent features.
Reviewing Numeric Data Using Graph


If you data happens to be numeric, our Annikken Andee App is able to collect the data and plot a graph for it. This helps you to visualize numerical data for analytical purposes.
Use Phone Functions From Arduino
When your Android phone is connected to Annikken Andee + Arduino, you can write code (in Arduino) to:
- Send SMS to a recipient
- Vocalize using Text-to-Speech
- Create a notification on Android
訂閱:
文章 (Atom)