【IT168 专稿】在电子商务网站的建设中,购物车这个功能是不能缺少的。而编写购物车的方法也是多种多样,有的简单有的复杂,而在本文中,将带领大家使用PHP,JQuery和CSS和AJAX技术,去设计一个拖拉式的购物车,这个购物车的效果比较酷,当你选择好要购买的商品后,直接用鼠标拖拉到一个购物篮的图标中去,则完成一次购物的过程,跟在超市购物的过程有点相像。本文将使用MySQL数据库,并且用到了jQuery中的一个很好用的插件simpletip(地址:http://craigsworks.com/projects/simpletip/),接下来会介绍其详细的用法。
步骤1、建立Mysql数据库
首先,为我们的购物车应用建立如下的mysql数据库文件,下面给出表结构,并添加一些样例数据:
 CREATE TABLE IF NOT EXISTS `internet_shop` (
 `id` int(6) NOT NULL auto_increment,
 `img` varchar(32) collate utf8_unicode_ci NOT NULL default '',
 `name` varchar(64) collate utf8_unicode_ci NOT NULL default '',
 `description` text collate utf8_unicode_ci NOT NULL,
 `price` double NOT NULL default '0',
 PRIMARY KEY (`id`),
 UNIQUE KEY `img` (`img`)
 ) ENGINE=MyISAM DEFAULT CHARSET=utf8 COLLATE=utf8_unicode_ci AUTO_INCREMENT=7 ;
 INSERT INTO `internet_shop` VALUES(1, 'iPod.png', 'iPod', 'The original and popular iPod.', 200);
 INSERT INTO `internet_shop` VALUES(2, 'iMac.png', 'iMac', 'The iMac computer.', 1200);
 INSERT INTO `internet_shop` VALUES(3, 'iPhone.png', 'iPhone', 'This is the new iPhone.', 400);
 INSERT INTO `internet_shop` VALUES(4, 'iPod-Shuffle.png', 'iPod Shuffle', 'The new iPod shuffle.', 49);
 INSERT INTO `internet_shop` VALUES(5, 'iPod-Nano.png', 'iPod Nano', 'The new iPod Nano.', 99);
 INSERT INTO `internet_shop` VALUES(6, 'Apple-TV.png', 'Apple TV', 'The new Apple TV. Buy it now!', 300);
这里我们只是简单地设计了商品的属性表,其中包括了商品的图片,名称,价格和描述,在实际的应用中,可能会设计更复杂的商品属性。
步骤2、设计页面结构
接下来,我们开始设计我们的页面结构,HTML代码如下:
 <div id="main-container"> <!—主DIV -->
 <div class="tutorialzine"> <!—标题 -->
 <h1>Shopping cart</h1>
 <h3>The best products at the best prices</h3>
 </div>
 <div class="container"> <!—显示商品区域-->
 <span class="top-label">
 <span class="label-txt">Products</span> <!—显示Products的标题div -->
 </span>
 <div class="content-area">
 <div class="content drag-desired">
  php
php // 这里动态从数据库中读取商品
 ?>
?>
 <div class="clear"></div> <!—这里用于当用户鼠标移动到该产品时,显示该产品的简介->
 </div>
 </div>
 <div class="bottom-container-border"> <!—区域底部的圆角区域-->
 </div>
 </div>
  <div class="container"> <!—购物车的div层>
 <span class="top-label">
 <span class="label-txt">Shopping Cart</span>
  </span>
 <div class="content-area">
 <div class="content drop-here"> <!—该区域为可接收用户拖拉物品到购物车的区域 -->
 <div id="cart-icon">
 <img src="img/Shoppingcart_128x128.png" alt="shopping cart" class="pngfix" width="128" height="128"/>
 <img src="img/ajax_load_2.gif" alt="loading.." id="ajax-loader" width="16" height="16" />
 </div>
 <!—购物表单?
在这个页面中,在上半部分,设置了一个div层,用于显示各种商品,并且在页面下半部分,另外设置了一个用于接收用户拖拽商品到购物车的层,只要用户把商品拖拽到这个层中的任意区域(不限于拖拽到购物车内),都被认为是用户把商品放到了购物车中。
步骤3、设计CSS
将CSS的名称命名为demo.css,代码如下:
 body,h1,h2,h3,p,td,quote,small,form,input,ul,li,ol,label{
 /* 为某些浏览器兼容性而设计 */
 margin:0px;
 padding:0px;
 font-family:Arial, Helvetica, sans-serif;
 }
}
 body{
body{ color:#555555;
 font-size:13px;
 background-color:#282828;
 }
}
 .clear{
  clear:both;
 }
}
 #main-container{ /* 页面中主层的宽度和边距设置*/
 width:700px;
 margin:20px auto;
 }
}
 .container{ /* 商品列表层和购物车区域的div设置 */
 margin-bottom:40px;
 }
}
 .top-label{ /* 这是页面上部products的样式*/
 background:url(img/label_bg.png) no-repeat;
  display:inline-block;
 margin-left:20px;
 position:relative;
 margin-bottom:-15px;
  }
}
 .label-txt{
  background:url(img/label_bg.png) no-repeat top right;
  display:inline-block;
 font-size:10px;
 height:36px;
 margin-left:10px;
  padding:12px 15px 0 5px;
 text-transform:uppercase;
 }
}
 .content-area{ /* content-area区域的样式 */
 background:url(img/container_top.png) no-repeat #fcfcfc;
 padding:15px 20px 0 20px;
 }
}
 .content{
  padding:10px;
 }
}
 .drag-desired{ /* 商品列表区域的样式*/
 background:url(img/drag_desired_label.png) no-repeat top right;
 padding:30px;
 }
}
 .drop-here{ /*购物车区域的样式 */
 background:url(img/drop_here_label.png) no-repeat top right;
 }
}
 .bottom-container-border{
  background:url(img/container_bottom.png) no-repeat;
 height:14px;
 }
}
 .product{ /* 商品的样式 */
 border:2px solid #F5F5F5;
 float:left;
 margin:15px;
 padding:10px;
 }
}
 .product img{
 cursor:move;
 }
}
 p.descr{
 padding:5px 0;
 }
}
 small{
 display:block;
 margin-top:4px;
 }
}
 .tooltip{ /* 商品的简单介绍用到的样式,这个样式jQuery 的simpletip plugin插件会用到 */
 position: absolute;
 top: 0;
 left: 0;
 z-index: 3;
 display: none;
 background-color:#666666;
 border:1px solid #666666;
 color:#fcfcfc;
 padding:10px;
 -moz-border-radius:12px; /* 圆角效果*/
 -khtml-border-radius: 12px;
 -webkit-border-radius: 12px;
 border-radius:12px;
 }
}
以上的样式中给出了关键部分的注释,其中注意的是使用了CSS3中的圆角效果样式border-radius,接下来再看剩余的其他样式部分:
 #cart-icon{ /* 购物篮的样式 */
 width:128px;
 float:left;
 position:relative;
  }
}
 #ajax-loader{
 position:absolute; /* 这是等待加载的图标的样式*/
 top:0px;
 left:0px;
 visibility:hidden;
 }
}
 #item-list{ /* 购物篮中已放置的商品的样式*/
 float:left;
 width:490px;
 margin-left:20px;
 padding-top:15px;
 }
}
 a.remove,a.remove:visited{ /* 移除购物车中商品的链接的样式 */
 color:red;
 font-size:10px;
 text-transform:uppercase;
 }
}
 #total{ /* 总计的样式*/
 clear:both;
 float:right;
 font-size:10px;
 font-weight:bold;
 padding:10px 12px;
 text-transform:uppercase;
 }
}
 #item-list table{
  background-color:#F7F7F7;
 border:1px solid #EFEFEF;
 margin-top:5px;
 padding:4px;
 }
}
 a.button,a.button:visited{ /* 结算按钮*/
 display:none;
 height:29px;
 width:136px;
 padding-top:15px;
 margin:0 auto;
 overflow:hidden;
 color:white;
 font-size:12px;
 font-weight:bold;
 text-align:center;
 text-transform:uppercase;
 background:url(img/button.png) no-repeat center top;
  }
}
 a.button:hover{
 background-position:bottom;
  text-decoration:none;
 }
}
为了兼容IE 6浏览器,我们特别添加如下的CSS样式代码,以让IE 6支持PNG下背景透明的特性:

将其中的iepngfix.htc和blank.gif解压缩到合适的目录内,.htc即Html Components,该文件需要在CSS中被调用;blank.gif是一个1×1像素的透明GIF图片。
最后,我们的页面效果做出来应该是这样的:

步骤4、PHP部分设计
下面进行PHP部分的代码设计,首先是列出数据库表中的商品,代码简单,如下所示:
 Demo.php中
 $result = mysql_query("SELECT * FROM internet_shop");
  while($row=mysql_fetch_assoc($result))
 {
{ echo '
 }
}
另外一个需要编写PHP代码的地方,是当用户鼠标移动到某个商品介绍时,通过jQuery的simpletips插件,将商品的图片作为参数,使用ajax方式调用,获得该商品的介绍,并且返回为一个HTML文件再给前端页面进行处理,该文件在ajax目录下的tips.php文件,如下所示:
 Ajax/tips.php
 define('INCLUDE_CHECK',1);
 require "../connect.php";
 if(!$_POST['img']) die("There is no such product!");
 $img=mysql_real_escape_string(end(explode('/',$_POST['img'])));
 $row=mysql_fetch_assoc(mysql_query("SELECT * FROM internet_shop WHERE img='".$img."'"));
 if(!$row) die("There is no such product!");
 echo ''.$row['name'].'
 price: $'.$row['price'].'
 Drag it to your shopping cart to purchase it';
此外,我们还需要编写一个addtocart.php文件,这个文件的作用是:当用户将选定的商品拖拉到购物车时,程序在数据库中检索该商品,然后以JSON的形式返回给前端,代码如下:

 define('INCLUDE_CHECK',1);
 require "../connect.php";
 if(!$_POST['img']) die("There is no such product!");
 $img=mysql_real_escape_string(end(explode('/',$_POST['img'])));
 $row=mysql_fetch_assoc(mysql_query("SELECT * FROM internet_shop WHERE img='".$img."'"));
 echo '{status:1,id:'.$row['id'].',price:'.$row['price'].',txt:\'\
 \
\


 \
\ \
\ \
\ \
\ \
\
 \
\ \'}';
\'}';
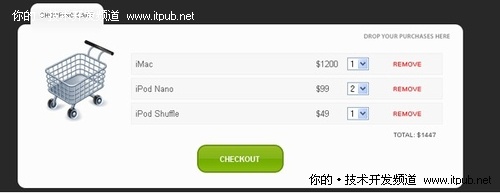
当用户把商品拖拉到购物车区域后,前端页面就以表格的形式逐一显示出用户所选的商品,如下图:

最后,我们看下当用户点结帐按钮后的页面order.php的编写,这里我们只是简单把用户的选择最后罗列出来并且进行商品价格合计,代码如下:
 php
php
 define('INCLUDE_CHECK',1);
 require "connect.php";
 if(!$_POST) // 检查是否有数据提交
 {
{ if($_SERVER['HTTP_REFERER'])
  header('Location : '.$_SERVER['HTTP_REFERER']);
 exit;
exit;  }
}
 ?>
?>


 php
php
 $cnt = array();
 $products = array();
 foreach($_POST as $key=>$value)
 {
{ $key=(int)str_replace('_cnt','',$key);
 $products[]=$key; // 将产品的ID编号放到数组products中去
 $cnt[$key]=$value;
 $result = mysql_query("SELECT * FROM internet_shop WHERE id IN(".join($products,',').")"); // selecting all the products with the IN() function
 if(!mysql_num_rows($result)) // 没找到相关产品
 {
{ echo '
There was an error with your order!
'; }
} else
else {
{ echo '
You ordered:
'; while($row=mysql_fetch_assoc($result))
 {
{ echo '
'.$cnt[$row['id']].' x '.$row['name'].'
 //计算总价格
 $total+=$cnt[$row['id']]*$row['price'];
 }
}
 echo '
Total: $
'.$total.''; }
}
 ?>
?>
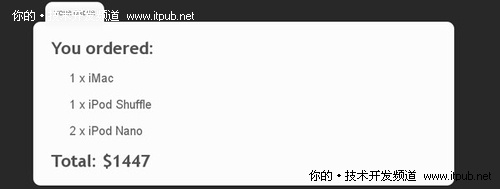
这里,使用数组products保存了用户选择好的商品名称,而cnt数组则记录了每个商品购买的件数,最后实现效果如下:

步骤5、jQuery部分设计
我们首先要引入相关的jQuery文件,如下:
 <script type="text/javascript" src="http://ajax.googleapis.com/ajax/libs/jquery/1.3.2/jquery.min.js"></script>
 <script type="text/javascript" src="http://ajax.googleapis.com/ajax/libs/jqueryui/1.7.2/jquery-ui.min.js"></script>
 <script type="text/javascript" src="simpletip/jquery.simpletip-1.3.1.pack.js"></script>
  <script type="text/javascript" src="script.js"></script>
同时,我们要编写自己的script.js文件,在这个文件中,我们使用了jQuery的toolstip控件:
 var purchased=new Array(); //该数组包含了用户购买的商品
 var totalprice=0; //商品总价
 $(document).ready(function(){
 $('.product').simpletip({ //使用simpletip控件
 offset:[40,0],
 content:'
 ',
', 
 onShow: function(){
 var param = this.getParent().find('img').attr('src');
 // 修复IE6的问题
 if($.browser.msie && $.browser.version=='6.0')
 {
{ param = this.getParent().find('img').attr('style').match(/src=\"([^\"]+)\"/);
 param = param[1];
 }
}
 // 通过ajax方式加载tips.php文件
 this.load('ajax/tips.php',{img:param});
 }
}
 });
});
 $(".product img").draggable({ // 允许所有商品图片能拖拽
 containment: 'document',
 opacity: 0.6,
 revert: 'invalid',
 helper: 'clone',
 zIndex: 100
 });
});
 $("div.content.drop-here").droppable({ // 当商品被拖拉到购物车区域时触发
 drop:
drop: function(e, ui)
 {
{ var param = $(ui.draggable).attr('src');
 // 修复IE 6下的问题
 if($.browser.msie && $.browser.version=='6.0')
 {
{ param = $(ui.draggable).attr('style').match(/src=\"([^\"]+)\"/);
 param = param[1];
 }
}
 addlist(param); //调用addlist方法
 }
}
 });
});
 });
}); 接下来看addlist方法的编写,其中都提供了详细的注释:
 function addlist(param)
 {
{

 $.ajax({ // ajax方法调用 addtocart.php
 type: "POST",
 url: "ajax/addtocart.php",
 data: 'img='+encodeURIComponent(param), // the product image as a parameter
 dataType: 'json', // JSON形式调用
 //在调用前,显示加载的小图标
 beforeSend: function(x){$('#ajax-loader').css('visibility','visible');},
  //调用成功时的回调方法
 success: function(msg){
 //调用成功后,隐藏等待加载的小图标
 $('#ajax-loader').css('visibility','hidden'); // hiding the loading gif animation
 //如果有出错
 if(parseInt(msg.status)!=1)
 {
{ return false; }
 else
else {
{ var check=false;
 var cnt = false;
 //检查某个商品是否已经在购物车中存在了
 for(var i=0; i<purchased.length;i++)
 {
{ if(purchased[i].id==msg.id) {
 check=true;
 cnt=purchased[i].cnt;
 break;
 }
} }
}
 if(!cnt)
  $('#item-list').append(msg.txt);
 if(!check) //如果该商品是新购买商品,购物车中不存在,则purchased数组中增加相关产品
 {
{ purchased.push({id:msg.id,cnt:1,price:msg.price});
 }
}
 else // 如果购物车中已经有该商品,则数量增加
 {
{ // 这里设置每样商品只能买3件,当然大家可以修改
 if(cnt>=3) return false;
 //增加购物车中显示的数量
 purchased[i].cnt++;
 //设置数量下拉框中的数量
 $('#'+msg.id+'_cnt').val(purchased[i].cnt);
 }
}
 totalprice+=msg.price; // 重新计算总价格
 update_total(); // 修改总价格
 }
}
 $('.tooltip').hide(); // 隐藏商品的介绍
 }
} });
}); }
}

 //帮助工具类,找出当前产品在purchased数组中的位置
 function findpos(id)
  {
{ for(var i=0; i<purchased.length;i++)
 {
{ if(purchased[i].id==id)
 return i;
 }
}
 return false;
 }
}
 //将商品从购物车中移除
 function remove(id)
  {
{ //找出其在数组中的位置
 var i=findpos(id);
 totalprice-=purchased[i].price*purchased[i].cnt; //更新总价格
 purchased[i].cnt = 0; // reset the counter设置purchased数组中,该商品的数量为0
 $('#table_'+id).remove(); //在购物车列表中删除该项目
 update_total();
  }
}

 //当用户点每个商品的下拉框,改变数量时触发该方法
 function change(id)
  {
{ var i=findpos(id);
 //更新总价格
 totalprice+=(parseInt($('#'+id+'_cnt').val())-purchased[i].cnt)*purchased[i].price;
 purchased[i].cnt=parseInt($('#'+id+'_cnt').val());
 update_total();
 }
}

 //计算当前购物车中的货品总价格
 function update_total()
 {
{ if(totalprice)
 {
{ //如果买了商品,显示总价格标签文本
 $('#total').html('total: $'+totalprice); $('a.button').css('display','block');
 }
} else // 如果没购买商品,不显示总价格标签文本
 {
{ $('#total').html('');
 $('a.button').hide();
 }
} }
}
最后,我们可以运行看到相关效果:
效果可以在这个地址看到:http://demo.tutorialzine.com/2009/09/shopping-cart-php-jquery/demo.php
相关代码下载:http://demo.tutorialzine.com/2009/09/shopping-cart-php-jquery/demo.zip


