Pages

Subscribe:

Ads 468x60px

Labels

顯示具有 MySQL 標籤的文章。 顯示所有文章

2014年11月2日 星期日

Update/Delete Multiple Rows using PHP

We are well expertise with PHP CRUD operations by accessing MySQL via PHP logic. Yet, we have seen about how to update and delete table rows one at a time. This article deals with selecting multiple rows for applying update/delete operations.
For selecting multiple rows, we are going to use checkbox input for submitting selected rows reference. We can get selected checkbox values via jQuery AJAX post or by accessing form from PHP after page refresh.

Steps in PHP Multiple Rows Update/Delete

While implementing multiple rows update or delete, we need to follow some steps. All the steps listed below is suitable for updating multiple rows. But, step 2, 3 is not required for deleting multiple rows. Instead, we can show a Javascript popup to ask for confirmation of delete.
php_mutiple_row_update_delete
  1. Selecting rows using checkbox input.
  2. Show form UI for updating table columns.
  3. Submit array of row details to PHP.
  4. Iterate into row details array to apply update/delete query for each.
First, let us start coding for updating multiple rows. And then, we can simplify it for delete operation by removing unwanted steps like form submit and etc.

Multiple Rows Update using Checkbox

We are going to take similar example seen in PHP CRUD article. From that example, let us take list_user.php and edit_user.php and continue with the list of steps stated above. With these steps, we should make little changes on list_user.php and edit_user.php.

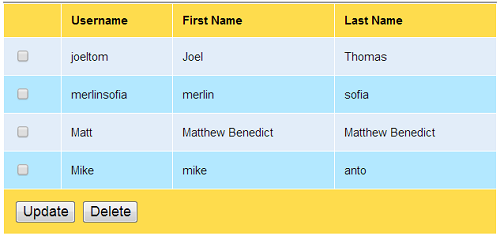
Selecting Rows using Checkboxes.

For each users row, we need to add checkbox input while iterating over a loop with query result. So, we should create another column with user’s list view for checkbox input.
So, while printing user table entries dynamically to the list view, the loop should contain the following items.
php
$i=0;
while($row = mysql_fetch_array($result)) {
if($i%2==0)
$classname="evenRow";
else
$classname="oddRow";
?>
php if(isset($classname)) echo $classname;?>">
php echo $row["userId"]; ?>" >
php echo $row["userName"]; ?> php echo $row["firstName"]; ?> php echo $row["lastName"]; ?> php echo $row["userId"]; ?>" class="link"> alt='Edit' title='Edit' src='images/edit.png' width='15px' height='15px' hspace='10' /> php echo $row["userId"]; ?>" class="link"> alt='Delete' title='Delete' src='images/delete.png' width='15px' height='15px'hspace='10' /> php $i++; } ?>
The HTML tags will recursively created with dynamic values for each iteration of the loop. Checkbox added for each user’s row will contain their id, accordingly, as its value. And, it will look like,
php_multiple_rows_with_checkbox
These values will be passed as an array of user ids to PHP page. With these selected checkbox values, the form is submitted via Javascript. On clickinh Update button, it will trigger setUpdateAction() event handler to set form action attribute before submit. And the script is,
function setUpdateAction() {
document.frmUser.action = "edit_user.php";
document.frmUser.submit();
}

Show Edit Form for Selected Rows.

Previously, we have seen about how to handle edit for each record. So, we showed only one tile containing single user details. But now, we should show multiple tiles, since we are updating multiple users at a time.
For that, we need to make two main changes with the edit_user.php, we have seen in PHP CRUD.
  • We should create editable form elements containing user details recursively for each user. This is similar to that we have done with user’s list view. The only difference is that we are displaying them with form input element to create edit interface.
  • And then, the second change, we should keep all elements name as an array. For example, if the element name is userName, then, it should be specified as userName[]. We can have more clearance on seeing the code below.
php
$rowCount = count($_POST["users"]);
for($i=0;$i<$rowCount;$i++) {
$result = mysql_query("SELECT * FROM users WHERE userId='" . $_POST["users"][$i] . "'");
$row[$i]= mysql_fetch_array($result);
?>


 border="0" cellpadding="10" cellspacing="0" width="500" align="center" class="tblSaveForm">


Username
php echo $row[$i]['userId']; ?>">php echo $row[$i]['userName']; ?>"> Password php echo $row[$i]['password']; ?>"> First Name php echo $row[$i]['firstName']; ?>"> Last Name php echo $row[$i]['lastName']; ?>"> php } ?>

Submitting Array of Updated Values.

We are specifying each input as an array. So, on submitting this multiple user information, array of user information for each user, will be passed to PHP code.

PHP Multi Dimensional Array Iteration.

By iterating over this multi dimensional array, each user record will be updated by setting current iteration values to MySQL UPDATE query. After successful update, the page will be redirected to list view by using PHP location header. And the PHP code is,
php
$conn = mysql_connect("localhost","root","");
mysql_select_db("phppot_examples",$conn);

if(isset($_POST["submit"]) && $_POST["submit"]!="") {
$usersCount = count($_POST["userName"]);
for($i=0;$i<$usersCount;$i++) {
mysql_query("UPDATE users set userName='" . $_POST["userName"][$i] . "', password='" . $_POST["password"][$i] . "', firstName='" . $_POST["firstName"][$i] . "', lastName='" . $_POST["lastName"][$i] . "' WHERE userId='" . $_POST["userId"][$i] . "'");
}
header("Location:list_user.php");
}
?>

Deleting Multiple Rows using PHP

Delete is very simple compared with update. Because, we need not show any user interface and it requires only the array of selected row ids. For multi row delete also we are submitting selected rows by using Javascript. As shown in the following script, we can use Javascript confirm() function, to get confirmation before delete.
function setDeleteAction() {
if(confirm("Are you sure want to delete these rows?")) {
document.frmUser.action = "delete_user.php";
document.frmUser.submit();
}
}
In PHP page, DELETE query is executed with MySQL WHERE clause specifying condition to match appropriate user id in each iteration. And the PHP code for delete will be as follows.
php
$conn = mysql_connect("localhost","root","");
mysql_select_db("phppot_examples",$conn);
$rowCount = count($_POST["users"]);
for($i=0;$i<$rowCount;$i++) {
mysql_query("DELETE FROM users WHERE userId='" . $_POST["users"][$i] . "'");
}
header("Location:list_user.php");
?>
This MySQL tutorial was added on September 23, 2013.

2014年4月1日 星期二

以 Dreamweaver 開發 PHP 講義 CH9 Session

撰寫人:致理電腦 林新德
一般講「會談」(session)是指客戶還在瀏覽該站,或者還在使用該站的服務。Session
是伺服器為了知道客戶端是否還在瀏覽該站的機制。為了不佔用連線資源,HTTP是
個溝通完就斷線的協定,所以伺服器無法得知客戶端是否還在該站瀏覽。因此,就
必須訂定一些規則來實現這個機制。
首先,server必須先分辨client,一般有兩種做法。第一種,在網站的所有連結中都置入
一個GET參數「客戶識別碼」(Session ID),這種方式實做起來較為麻煩,而且一
不小心就會置換「客戶識別碼」。
第二種,是利用Cookie存放「Session ID」,只要在client第一次拜訪時將Session ID存入
Cookie即可。這種是常用也是比較方便的做法。此時Seesion的存活就會依賴Cookie
是否有效而定。
若client的瀏覽器停在某個網頁,使用者可能某些原因(例如:去洗澡)久久未再拜訪該
站,或者根本就已離開該站。此時會依Session的存活時間,決定Session是否有效。
當然,server是以client最後一次拜訪開始計時的;若client在Session存活時間內,
持續訪問該站,Session就會一直有效。一般Session的存活時間會設定為5~20分鐘,
流量越大的網站,Session存活時間設得越短越節省主機資源。
有了Session ID之後,server會在主機記憶體為每個Session ID建立一個對應的Session物
件,資料就存在Session物件裡。有效的Session越多,使用的記憶體就會越多。
◎ 常用操作Session的函式有:session_start() 啟用Session、
session_destroy() 清除Session物件。讀取和設定Session 使用 $_SESSION 預
設變數。session_name函式可以讀取或設定Session ID名稱,預設為PHPSESSID。
◎ 登出時,只要用session_destroy()函式即可。

[教學]PHP會員登入機制,session的使用,簡易型電話簿範例(對MySQL新增、修改、刪除)!

    因為全棋同學的系統需求,雖然會員機制並不難,他一定也很快就學會了,而我還是寫此教學來引導他,幫助他系統擴展的更快,相信他的系統在未來也一定會很有用的! 而這個教學主要是說明session應用在會員機制上,而教學的程式碼還是有些地方有沒有考慮的很周詳,安全上還是會有瑕疵,希望大家見諒。
以下為資料表的欄位資料:
member_table
以下為會員系統示意圖:
login示意圖
(1) 首頁 - 登入頁面 (index.php)

connect.php
">
帳號:id" />

密碼:pw" />

  
register.php">申請帳號
(2) php連結MySQL資料庫語法(mysql_connect.inc.php)

//資料庫設定
//資料庫位置

$db_server = "localhost";
//資料庫名稱
$db_name = "mydb";
//資料庫管理者帳號
$db_user = "root";
//資料庫管理者密碼$db_passwd = "1234";
//對資料庫連線if(!@mysql_connect($db_server, $db_user, $db_passwd))
        die("無法對資料庫連線");

//資料庫連線採UTF8
mysql_query("SET NAMES utf8");

//選擇資料庫
if(!@mysql_select_db($db_name))
        die("無法使用資料庫");
?> 
(3) 會員ID、PW與MySQL資料庫作認證(connect.php)


//連接資料庫
//只要此頁面上有用到連接MySQL就要include它

include("mysql_connect.inc.php");$id = $_POST['id'];
$pw = $_POST['pw'];
//搜尋資料庫資料
$sql = "SELECT * FROM member_table where username = '$id'";
$result = mysql_query($sql);
$row = @mysql_fetch_row($result);
//判斷帳號與密碼是否為空白//以及MySQL資料庫裡是否有這個會員
if($id != null && $pw != null && $row[1] == $id && $row[2] == $pw)
{
        //將帳號寫入session,方便驗證使用者身份        $_SESSION['username'] = $id;        echo '登入成功!';
        echo '';
}
else
{
        echo '登入失敗!';
        echo '';
}
?>
(4) 會員登入成功後 頁面 - 此頁面有「新增」、「修改」、「刪除」與「登出」的連結
      並且會顯示出所有會員資料(member.php)


include("mysql_connect.inc.php");
echo '登出 

';
//此判斷為判定觀看此頁有沒有權限
//說不定是路人或不相關的使用者
//因此要給予排除

if($_SESSION['username'] != null)
{
        echo '新增    ';
        echo '修改    ';
        echo '刪除 

';
    
        //將資料庫裡的所有會員資料顯示在畫面上
        $sql = "SELECT * FROM member_table";
        $result = mysql_query($sql);
        while($row = mysql_fetch_row($result))
        {
                 echo "$row[0] - 名字(帳號):$row[1], " . 
                 
"電話:$row[3], 地址:$row[4], 備註:$row[5]
";
        }
}
else
{
        echo '您無權限觀看此頁面!';
        echo '';
}
?>
(5)  登出 - 洗掉登入使用者之session(logout.php)


//將session清空
unset($_SESSION['username']);
echo '登出中......';
echo '';
?>
(6) 加入(註冊)會員 - 「填寫」會員資料 (register.php)

register_finish.php
">
帳號:id" />

密碼:pw" />

再一次輸入密碼:pw2" />

電話:telephone" />

地址:address" />

備註:


(7) 加入(註冊)會員 - 「新增」會員資料進MySQL資料庫 (register_finish.php)


include("mysql_connect.inc.php");

$id = $_POST['id'];
$pw = $_POST['pw'];
$pw2 = $_POST['pw2'];
$telephone = $_POST['telephone'];
$address = $_POST['address'];
$other = $_POST['other'];
//判斷帳號密碼是否為空值
//確認密碼輸入的正確性

if($id != null && $pw != null && $pw2 != null && $pw == $pw2)
{
        //新增資料進資料庫語法
        $sql = "insert into member_table (username, password, telephone, address, other) values ('$id', '$pw', '$telephone', '$address', '$other')";        if(mysql_query($sql))
        {
                echo '新增成功!';
                echo '';
        }
        else
        {
                echo '新增失敗!';
                echo '';
        }
}
else
{
        echo '您無權限觀看此頁面!';
        echo '';
}
?>
(8) 修改會員資料 - 「填寫」要修改之會員資料(update.php)


include("mysql_connect.inc.php");

if($_SESSION['username'] != null)
{
        //將$_SESSION['username']丟給$id
        //這樣在下SQL語法時才可以給搜尋的值

        $id = $_SESSION['username'];
        //若以下$id直接用$_SESSION['username']將無法使用
        $sql = "SELECT * FROM member_table where username='$id'";
        $result = mysql_query($sql);
        $row = mysql_fetch_row($result);
    
        echo "
update_finish.php
\">";
        echo "帳號:id
\" value=\"$row[1]\" />(此項目無法修改)
";
        echo "密碼:pw\" value=\"$row[2]\" />
";
        echo "再一次輸入密碼:pw2\" value=\"$row[2]\" />
";
        echo "電話:telephone\" value=\"$row[3]\" />
";
        echo "地址:address\" value=\"$row[4]\" />
";
        echo "備註:
";
        echo "";
        echo "";
}
else
{
        echo '您無權限觀看此頁面!';
        echo '';
}
?>
(9) 修改會員資料 - 「更新」要修改之會員資料進MySQL資料庫(update_finish.php)


include("mysql_connect.inc.php");

$id = $_POST['id'];
$pw = $_POST['pw'];
$pw2 = $_POST['pw2'];
$telephone = $_POST['telephone'];
$address = $_POST['address'];
$other = $_POST['other'];
//紅色字體為判斷密碼是否填寫正確
if($_SESSION['username'] != null && $pw != null && $pw2 != null && $pw == $pw2)
{
        $id = $_SESSION['username'];
    
        //更新資料庫資料語法
        $sql = "update member_table set password=$pw, telephone=$telephone, address=$address, other=$other where username='$id'";        if(mysql_query($sql))
        {
                echo '修改成功!';
                echo '';
        }
        else
        {
                echo '修改失敗!';
                echo '';
        }
}
else
{
        echo '您無權限觀看此頁面!';
        echo '';
}
?>
(10) 刪除會員資料 - 「填寫」要刪除之會員帳號(delete.php)


if($_SESSION['username'] != null)
{
        echo "
delete_finish.php
\">";
        echo "要刪除的帳號:id
\" />
";
        echo "";
        echo "";
}
else
{
        echo '您無權限觀看此頁面!';
        echo '';
}
?>
(11) 刪除會員資料 - 對MySQL資料庫進行「刪除」會員資料(delete_finish.php)


include("mysql_connect.inc.php");
$id = $_POST['id'];
if($_SESSION['username'] != null)
{
        //刪除資料庫資料語法
        $sql = "delete from member_table where username='$id'";        if(mysql_query($sql))
        {
                echo '刪除成功!';
                echo '';
        }
        else
        {
                echo '刪除失敗!';
                echo '';
        }
}
else
{
        echo '您無權限觀看此頁面!';
        echo '';
}
?>

以上若有錯誤,也請各位告知或糾正,謝謝~~~!
本來程式碼要加上實際顯示出來的圖片作介紹的,但因為真的花太多時間了,只好作罷!!!

2014年3月16日 星期日

Export MySQL to CSV (Excel) using php

You can export your MySQL database to .csv file format (Microsoft Excel file) easily using php.
This tutorial require 1 PHP file and 1 table of mySQL database.
1. exportcsv.php
2. The table is with 2 fields: id(auto_increment), name(varchar, 50) and put some records about 20 – 30 records into this table. (directly by phpMyAdmin)
The exportcsv.php file looks like this :-
< ?php
// Connect database
$database="mydb";
$table="mytablename";
mysql_connect("localhost","","");
mysql_select_db("mydb");
 
$result=mysql_query("select * from $table");
 
$out = '';
 
// Get all fields names in table "mytablename" in database "mydb".
$fields = mysql_list_fields(mydb,$table);
 
// Count the table fields and put the value into $columns.
$columns = mysql_num_fields($fields);
 
// Put the name of all fields to $out.
for ($i = 0; $i < $columns; $i++) {
$l=mysql_field_name($fields, $i);
$out .= '"'.$l.'",';
}
$out .="\n";
 
// Add all values in the table to $out.
while ($l = mysql_fetch_array($result)) {
for ($i = 0; $i < $columns; $i++) {
$out .='"'.$l["$i"].'",';
}
$out .="\n";
}
 
// Open file export.csv.
$f = fopen ('export.csv','w');
 
// Put all values from $out to export.csv.
fputs($f, $out);
fclose($f);
 
header('Content-type: application/csv');
header('Content-Disposition: attachment; filename="export.csv"');
readfile('export.csv');
?>