


2014年11月2日 星期日
Update/Delete Multiple Rows using PHP
We are well expertise with PHP CRUD operations by accessing MySQL via PHP logic. Yet, we have seen about how to update and delete table rows one at a time. This article deals with selecting multiple rows for applying update/delete operations.
For selecting multiple rows, we are going to use checkbox input for submitting selected rows reference. We can get selected checkbox values via jQuery AJAX post or by accessing form from PHP after page refresh.
Steps in PHP Multiple Rows Update/Delete
While implementing multiple rows update or delete, we need to follow some steps. All the steps listed below is suitable for updating multiple rows. But, step 2, 3 is not required for deleting multiple rows. Instead, we can show a Javascript popup to ask for confirmation of delete.

- Selecting rows using checkbox input.
- Show form UI for updating table columns.
- Submit array of row details to PHP.
- Iterate into row details array to apply update/delete query for each.
First, let us start coding for updating multiple rows. And then, we can simplify it for delete operation by removing unwanted steps like form submit and etc.
Multiple Rows Update using Checkbox
We are going to take similar example seen in PHP CRUD article. From that example, let us take list_user.php and edit_user.php and continue with the list of steps stated above. With these steps, we should make little changes on list_user.php and edit_user.php.
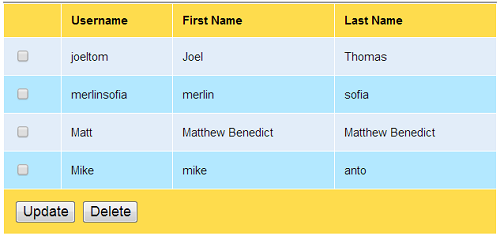
Selecting Rows using Checkboxes.
For each users row, we need to add checkbox input while iterating over a loop with query result. So, we should create another column with user’s list view for checkbox input.
So, while printing user table entries dynamically to the list view, the loop should contain the following items.
php
$i=0;
while($row = mysql_fetch_array($result)) {
if($i%2==0)
$classname="evenRow";
else
$classname="oddRow";
?>
php if(isset($classname)) echo $classname;?>">
The HTML tags will recursively created with dynamic values for each iteration of the loop. Checkbox added for each user’s row will contain their id, accordingly, as its value. And, it will look like,
These values will be passed as an array of user ids to PHP page. With these selected checkbox values, the form is submitted via Javascript. On clickinh Update button, it will trigger setUpdateAction() event handler to set form action attribute before submit. And the script is,
function setUpdateAction() {
document.frmUser.action = "edit_user.php";
document.frmUser.submit();
}
Show Edit Form for Selected Rows.
Previously, we have seen about how to handle edit for each record. So, we showed only one tile containing single user details. But now, we should show multiple tiles, since we are updating multiple users at a time.
For that, we need to make two main changes with the edit_user.php, we have seen in PHP CRUD.
- We should create editable form elements containing user details recursively for each user. This is similar to that we have done with user’s list view. The only difference is that we are displaying them with form input element to create edit interface.
- And then, the second change, we should keep all elements name as an array. For example, if the element name is userName, then, it should be specified as userName[]. We can have more clearance on seeing the code below.
php $rowCount = count($_POST["users"]); for($i=0;$i<$rowCount;$i++) { $result = mysql_query("SELECT * FROM users WHERE userId='" . $_POST["users"][$i] . "'"); $row[$i]= mysql_fetch_array($result); ?>border="0" cellpadding="10" cellspacing="0" width="500" align="center" class="tblSaveForm">
Username
Submitting Array of Updated Values.
We are specifying each input as an array. So, on submitting this multiple user information, array of user information for each user, will be passed to PHP code.
PHP Multi Dimensional Array Iteration.
By iterating over this multi dimensional array, each user record will be updated by setting current iteration values to MySQL UPDATE query. After successful update, the page will be redirected to list view by using PHP location header. And the PHP code is,
php
$conn = mysql_connect("localhost","root","");
mysql_select_db("phppot_examples",$conn);

if(isset($_POST["submit"]) && $_POST["submit"]!="") {
$usersCount = count($_POST["userName"]);
for($i=0;$i<$usersCount;$i++) {
mysql_query("UPDATE users set userName='" . $_POST["userName"][$i] . "', password='" . $_POST["password"][$i] . "', firstName='" . $_POST["firstName"][$i] . "', lastName='" . $_POST["lastName"][$i] . "' WHERE userId='" . $_POST["userId"][$i] . "'");
}
header("Location:list_user.php");
}
?>
Deleting Multiple Rows using PHP
Delete is very simple compared with update. Because, we need not show any user interface and it requires only the array of selected row ids. For multi row delete also we are submitting selected rows by using Javascript. As shown in the following script, we can use Javascript confirm() function, to get confirmation before delete.
function setDeleteAction() {
if(confirm("Are you sure want to delete these rows?")) {
document.frmUser.action = "delete_user.php";
document.frmUser.submit();
}
}
In PHP page, DELETE query is executed with MySQL WHERE clause specifying condition to match appropriate user id in each iteration. And the PHP code for delete will be as follows.
php
$conn = mysql_connect("localhost","root","");
mysql_select_db("phppot_examples",$conn);
$rowCount = count($_POST["users"]);
for($i=0;$i<$rowCount;$i++) {
mysql_query("DELETE FROM users WHERE userId='" . $_POST["users"][$i] . "'");
}
header("Location:list_user.php");
?>
This MySQL tutorial was added on September 23, 2013.
2014年10月30日 星期四
一秒內連上無線基地台,使用 QR Code 快速產生Wifi network 設定資料
一秒內連上無線基地台,使用 QR Code 快速產生Wifi network 設定資料
很簡單
到這網站
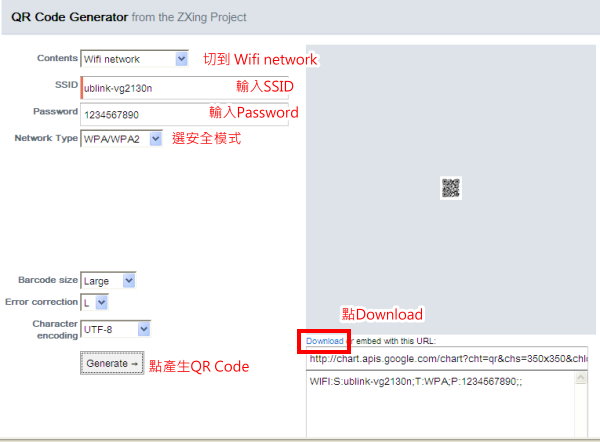
先選Contents為 Wifi network
SSID就填你的無線AP的SSID
Password就是無顯的Password
Network Type就選你的安全模式
再點Generate
再點Download

Download之後
把他印在會議室門口
或是需要用到無線連接的地方
只要用QR Scan工具
您就可以不需要告訴客人設定資料
一秒馬上連上無線網路
您就可以不需要告訴客人設定資料
一秒馬上連上無線網路
要更改
只要換QR Code的條碼就好了
是不是很方便啊 ^^
只要換QR Code的條碼就好了
是不是很方便啊 ^^
2014年10月26日 星期日
[Dreamweaver教學] 網站PHP檔案UTF-8編碼或不明的空格問題(解決:設定BOM)
一般我們在寫網頁程時,網站PHP檔案普遍會採用UTF-8編碼,但常常遇到編碼為UTF-8後還是會因不明原因出現「????亂碼」。或是將檔案丟到伺服器後,畫面會出現不明的「空格」。如果你是Dreamweaver使用者,只要依下列設定將BOM檔頭去除,即可解決這個問題。
1. 到Dreamweaver > 修改> 頁面屬性

2.在「標題/編碼方式」(快速鍵:Ctrl+J),去除「包含Unicode簽名(BOM)」選項勾選即可。

3. 完成。
至於為什麼要去除「包含Unicode簽名(BOM)」,網路上的網友對這部份有清楚的說明,就請大家自行參考囉。
參考網頁:
解決PHP BOM檔頭問題
http://chunju.pixnet.net/blog/post/25404790-%E8%A7%A3%E6%B1%BAphp-bom%E6%AA%94%E9%A0%AD%E5%95%8F%E9%A1%8C-
http://chunju.pixnet.net/blog/post/25404790-%E8%A7%A3%E6%B1%BAphp-bom%E6%AA%94%E9%A0%AD%E5%95%8F%E9%A1%8C-
关于bom以及utf-8的问题Dreamweaver中除去BOM的方法
http://hi.baidu.com/383215209/item/f4e95d76ae15fd2cd7a89cf5
http://hi.baidu.com/383215209/item/f4e95d76ae15fd2cd7a89cf5
Read more: http://www.cadiis.com.tw/lessons-learned/291-dreamweaver-utf8-code#ixzz3HGXjO7QL
2014年10月25日 星期六
Nokia走入歷史! 新品牌改名「微軟Lumia」
「Nokia」(諾基亞)的粉絲要傷心了!微軟公司24日正式宣布,將「Microsoft Lumia」取代「Nokia Lumia」品牌,往後Lumia系列手機將以新名稱與大眾見面。
微軟公司於今年四月份正式宣布完成併購諾基亞行動通訊部門業務後,曾於22日向媒體表示,未來一個月內,「Nokia」及「Windows Phone」品牌將進行更名,「Nokia Lumia」手機計畫改為「Microsoft Lumia」;據《每日郵報》報導,「Nokia」昨日於官方網站中發布文章,證實這項消息,最新的Lumia830與Lumia730/735將成為「Nokia Lumia」品牌的末代手機。
對此,微軟手機市場行銷部門資深副總圖拉(Tuula Rytilä)表示,目前改名過程已經進行中,未來系列產品、通路等都會陸續更名,至於「Lumia」的現有產品會繼續銷售,低階非智慧型手機也會以「Nokia」品牌繼續販賣。

工研院研發「Juiker」 正式挑戰LINE
韓國通訊軟體LINE,光台灣就號稱有1700萬使用者。但現在有一款由台灣本土工研院研發的app通訊軟體「揪科Juiker」,現在跟第二類電信業者合作,打算正式跟LINEPK。由於日前行政院剛因擔心資安問題,下令公務連絡不准傳LINE或微信,院長江宜樺都帶頭使用、推薦Juiker,也讓這款通訊軟體備受矚目!
通訊軟體line風靡全球,各種可愛貼圖成了聊天必備的工具,甚至能用line打電話,不過現在出現對手!
貼圖竟然還會講話,超特別!而且這款居然是台灣工研院自行研發的APP通訊軟體juiker!雖然只是剛推出。但因為之前行政院曾因擔心資安問題,要求公務人員不得使用LINE跟微信等通訊軟體,院長江宜樺更大力推薦本土juiker,成了公部門和金融業最愛。第二類電信「全網通」看好juiker穩定性,策略結盟,準備挑戰line和其它電信業。
從去年11月就開始推出的juiker,雖然目前只有120萬用戶,但juiker多了防詐騙功能比較安全,另外也能用來撥打市內電話,就連貼圖也能講話,略勝一籌。工研院表示,juiker是以企業商務需求為設計核心,會比一般社交功能的APP,更注重資訊安全。
國產juiker結合電信業創新求變,要來挑戰熱門通訊軟體line,也成了另類的台韓大戰。
(民視新聞 顏喬偉、郭文海 台北報導)

訂閱:
文章 (Atom)